Posts in Food
Stuffed Dates 5 Ways (my first cooking video!)

Video was shot using the iPhoneX + DJI Osmo Mobile 2 for stabilization. Edited with Adobe Premiere Pro CC 2018 and Adobe After Effects CC 2018.


Welcome to episode 1 of "Cooking with Cinders", a new segment on my YouTube channel focused on cooking and baking!


Stuffed Dates 5 Ways


I've always posted food content on my blog, but I never put much thought into actually filming a cooking demo until after I finished up my Italy vlogs. Thanks to editing those long videos, I became way more familiar with Premiere and After Effects than I ever would've imagined, and it only seemed natural to apply this knowledge to creating a cooking video as well!

The first episode of this series is going to be on making stuffed dates. And not only one kind of stuffed date, but five. Because, let's face it: you're going to go on some pretty drastically different dates in life. Some of them are gonna be great and others are going to start and end terribly and make you cringe just at the memory of them. But don't worry, the five dates in this post won't fail you and are going to be very, very delicious.


Stuffed Dates 5 Ways


Dates are a great alternative to more processed, sugary snacks when you're craving something sweet. Not only are they delicious, but they're full of health benefits. Because they're rich in fibers, they'll help reduce bloating and digestion. They're low on sodium but loaded with potassium, which helps strengthen the nervous system. In addition, they contain a lot of protein, which make them a great post-workout snack or breakfast option. 

The most attractive aspect of dates for me is their skincare benefits. They're rich in Vitamin C, which is widely known for fading dark spots and helping with your skin's elasticity. They also contain Vitamin D, which boosts your skin's immune system and destroys free radicals that can cause premature aging.


Stuffed Dates 5 Ways


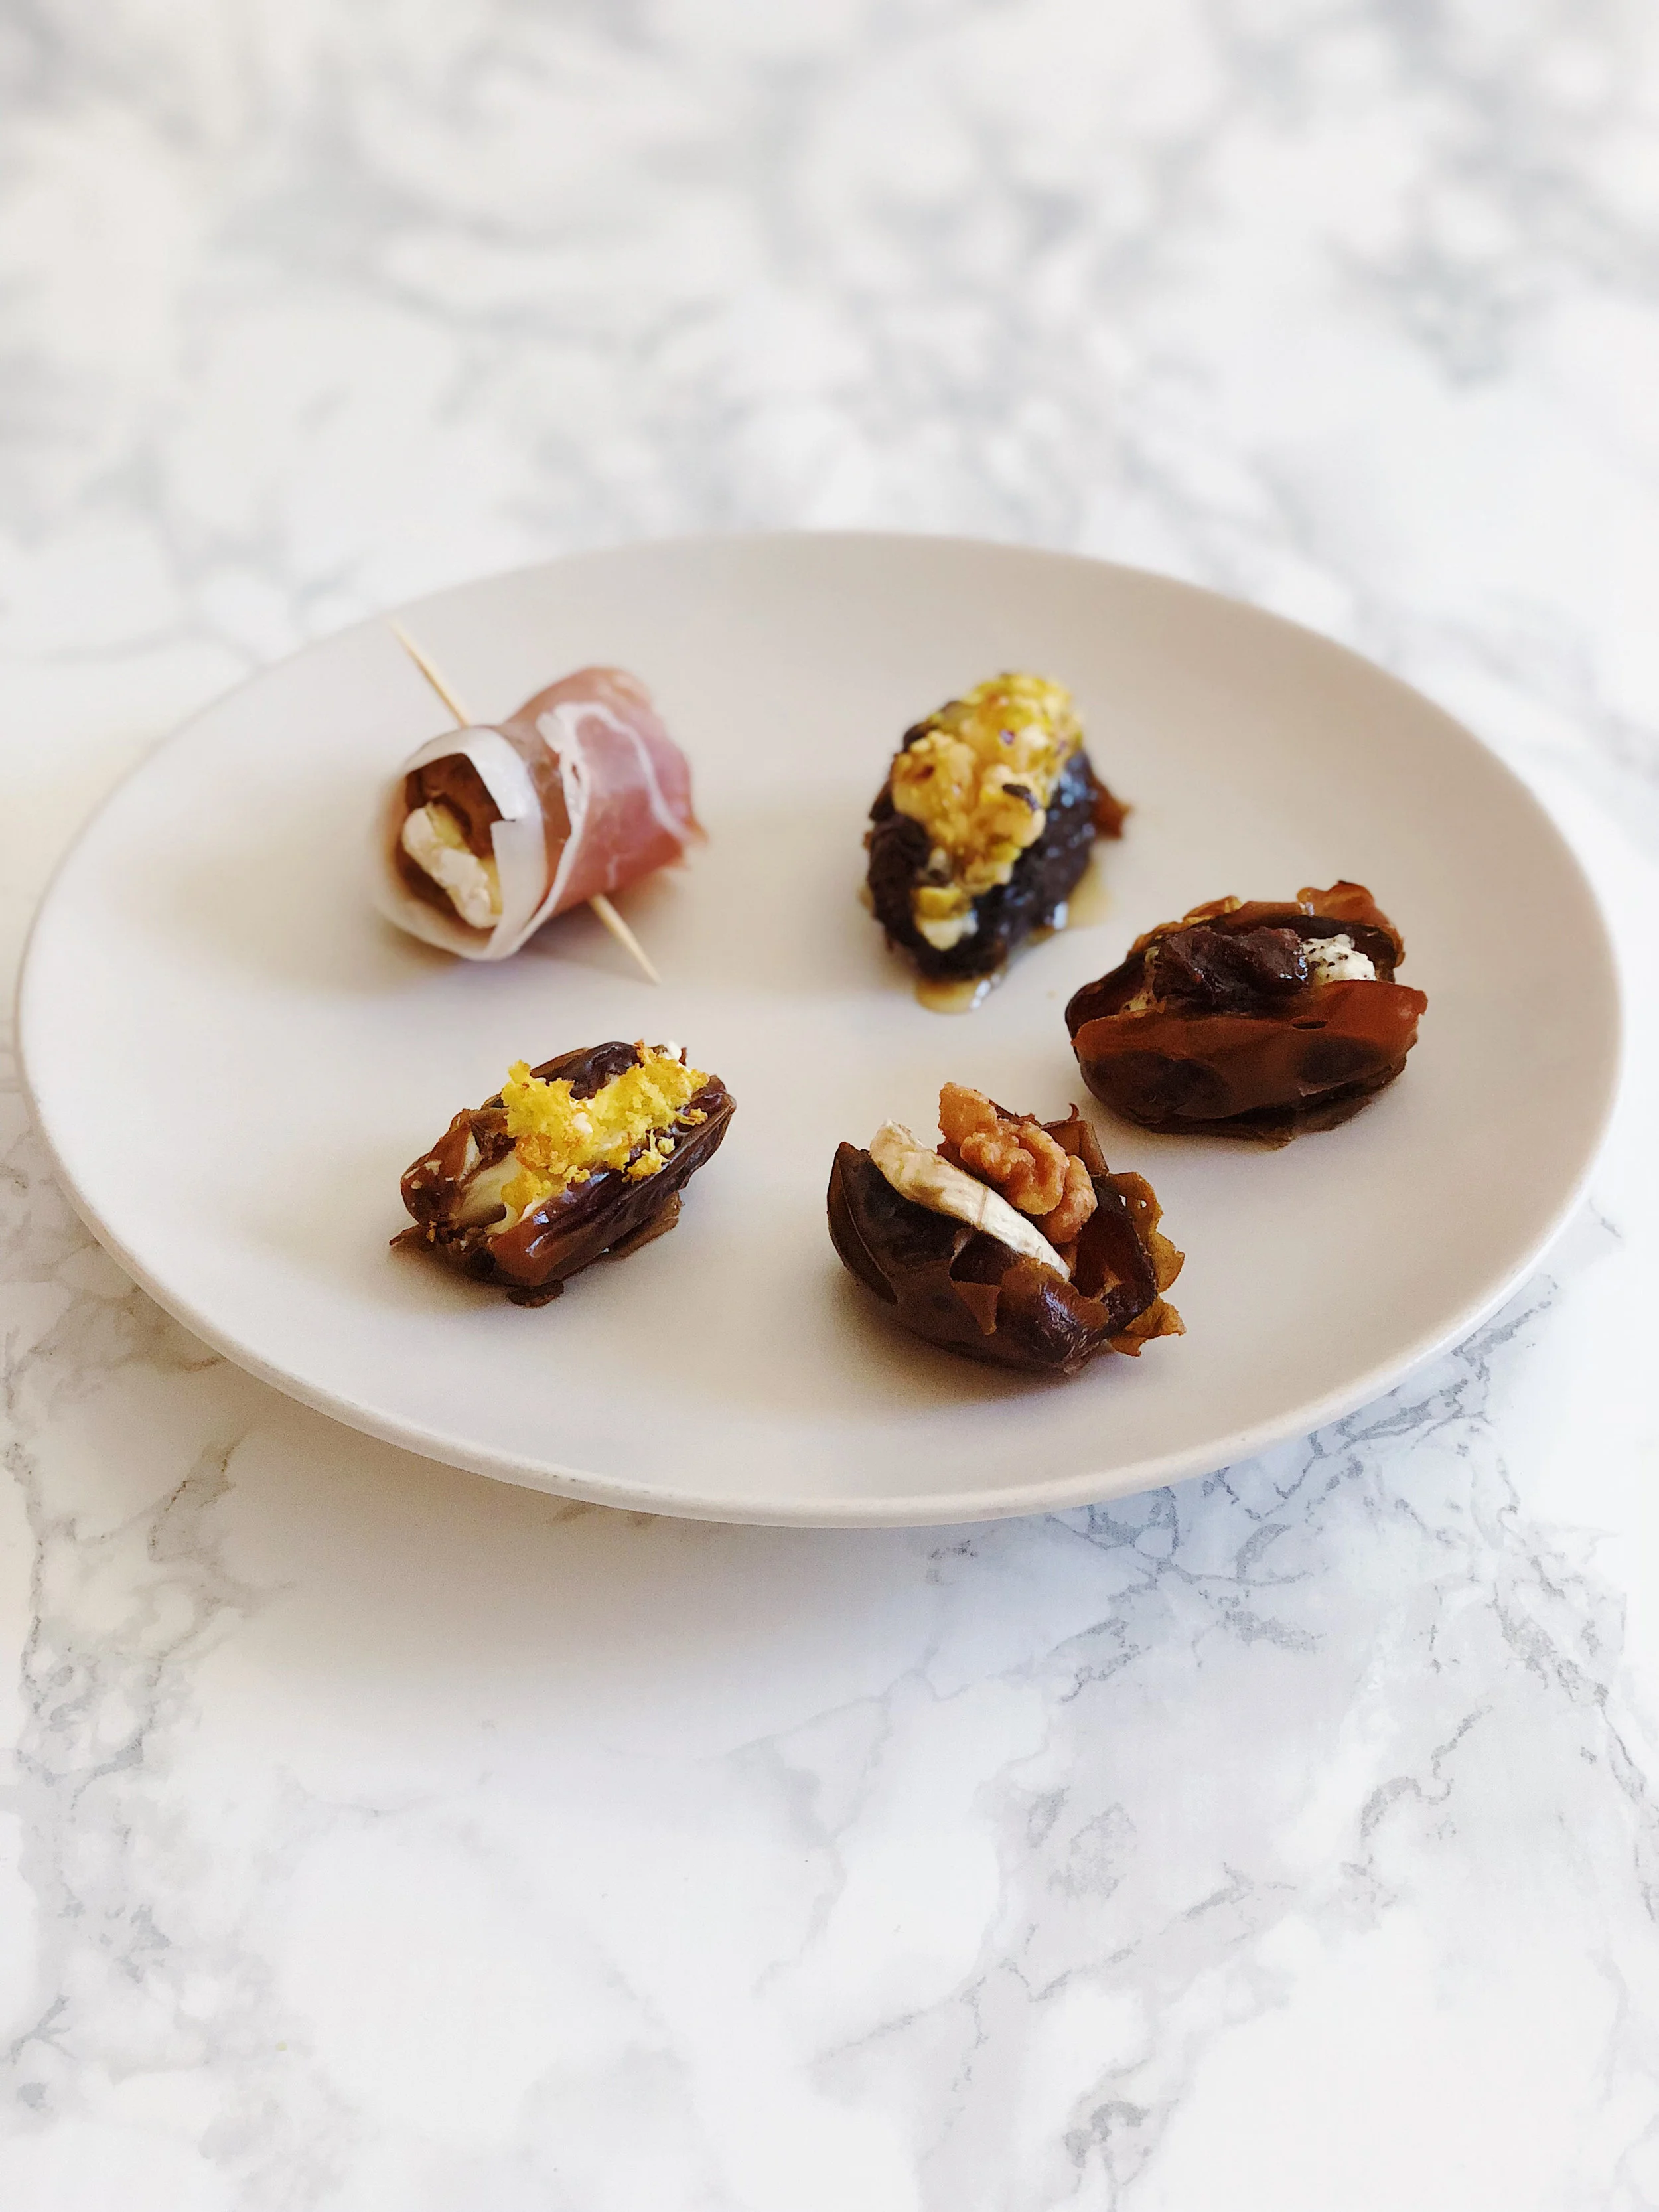
Dates are a great canvases or both sweet and savory ingredients. Here are five different ways to use dates to create the perfect spread for a cocktail party, afternoon snack, or healthy breakfast:


Pistachio, Honey, and Ricotta Stuffed Date

1. Pistachio, Honey, and Ricotta Stuffed Date

Ingredients (makes 12):
1/2 cup ricotta cheese
1 tbsp honey
1/4 cup shelled pistachios
12 dates with pits removed

Directions:
1) Combine the ricotta cheese and honey. Be sure not to add too much honey since the dates will already contribute a lot of sweetness

2.) Finely chop the pistachios

3) Stuff the open dates with the ricotta and honey mixture and sprinkle the chopped pistachios on top. Drizzle extra honey on top if desired

4) Optional: Toast in a 400° F (around 200° C) oven for 3-5 minutes

 
Earl Grey, Fig, and Ricotta Stuffed Date

2. Earl Grey, Fig, and Ricotta Stuffed Date

Ingredients (makes 12):
1/2 cup ricotta cheese
1 tbsp honey
1/4 cup of earl grey tea
1/4 cup of fig jam*
12 dates with pits removed

* If you can't find fig jam, feel free to substitute with any other fruit jam. I found my jar from Trader Joes.

Directions:
1) Combine the ricotta cheese and honey. Then add in the earl grey (I simply took my tea from an earl grey tea bag)

2) Stuff the open dates with the ricotta and earl grey mixture and add a dollop of fig jam on top

3) Optional: Toast in a 400° F (around 200° C) oven for 3-5 minutes

Banana and Walnut Stuffed Date

3. Banana and Walnut Stuffed Date

Ingredients (makes 12):
1 ripe banana
12 walnuts
12 dates with pits removed

Directions:
1) Slice the banana thinly into 12 pieces for each date

2) Stuff the open dates with a slice of banana and 1 piece of walnut

3) Optional: Toast in a 400° F (around 200° C) oven for 3-5 minutes

 
Lemon and Cream Cheese Stuffed Date

4. Lemon Cream Cheese and Sesame Stuffed Date

Ingredients (makes 12):
1/4 cup lemon zest
1/4 cup of lemon juice
1/2 cup of cream cheese, softened
1 tbsp sesame seeds

Directions:
1) Soften up the cream cheese by taking it out of the refrigerator in advance, or microwaving it for a few seconds

2) Combine the lemon juice and cream cheese, and stuff the mixture into the open dates

3) Top off each date with the lemon zest and sprinkle on the sesame seeds

4) Optional: Toast in a 400° F (around 200° C) oven for 3-5 minutes

 
Prosciutto Wrapped Dates stuffed with Brie

5. Prosciutto wrapped Dates stuffed with Brie

Ingredients (makes 12):
4 oz prosciutto
Brie
12 dates with pits removed

Directions:
1) Slice the Brie into bite-sized pieces

2) Slice the prosciutto into inch-wide pieces that will cover the surface area of the date

3) Stuff each open date with a slice of Brie and wrap a slice of prosciutto around the outside

4) Secure each date with a toothpick and they're ready to eat! 


Surprisingly simple, right? Definitely feel free to get creative with these, and stuff them with your own set of favorite ingredients—or even whatever you have left in the fridge and pantry.


Stuffed Dates 5 Ways


It is not by any means required that you toast these dates in the oven. I just find that by doing so, you give bring out the flavor of the nuts more, and allow the honey to carmelize on top of the dates.


Stuffed Dates 5 Ways


I'm all in favor of making delicious food that don't take a large amount of time or a wide range of ingredients—and it looks like my previous posts have all been focused on making foods of this nature. If you have a preference for more complicated recipes or simpler dishes that you can just whip up, please let me know in the comments :)

If you enjoyed watching, please give the video a thumbs up. If you'd like to see more cooking demos, please subscribe to my YouTube Channel to stay updated! 

♥ Cindy

 
Food, 2Cindy Zhang Comment
4 Ingredient Pasta - Cacio e Pepe
Cacio e Pepe - Simple Pasta with only 4 ingredients


If you're not counting the egg, Cacio e Pepe is a dish that requires only 4 ingredients: pasta, black pepper, pecorino cheese, and pasta water. A common staple in Roman cuisine, this dish appeared on the menus of multiple restaurants I visited in Italy. Since this dish is extremely simple, it was not intimidating at all to recreate it in the comfort of my own kitchen. 

Because this dish contains so few ingredients, I decided to add a poached egg on top of the pasta for a protein boost. Poached eggs might seem like a tricky item to make, but all it takes is a few tips and tricks to make sure that you succeed.


Cacio e Pepe - Simple 4-ingredient Pasta


Noodles are always better with a runny egg on top—no questions asked.


Cacio e Pepe - Simple 4-ingredient Pasta


poached eggs tips and tricks

Use a small bowl—crack the egg into a small bowl before dropping it into the water. This will make sure that the egg occupies a smaller space in the water, thus staying together better. Doing this step will also ensure that you don't accidentally leave any egg shells in the egg.

Spin the water—Make a "tornado" in the water with a spoon before adding the egg. This will allow the egg to spiral onto itself and prevent it from falling apart in the water.

Be patient, but not too patient—although overcooking a poached egg is a big no-no, the egg will still need to stay in the water for while before you can actually pick it up with a spoon. I can't tell you how many times I've removed an egg too early from the water only to have it fall apart on my dish or within the pot.

No need for vinegar—I find that sour eggs are not exactly palatable and that you can make an completely perfect poached egg without adding vinegar to firm it up. Simply making sure that the water is moving and spiraling before you add in the egg will suffice.


Cacio e Pepe - Simple 4-ingredient Pasta


Cacio e Pepe, directly translating "cheese and pepper" in Italian, is usually made with a thin pasta like spaghetti. Because this recipe is so minimal, it can be a great backdrop to showcase a high quality pecorino cheese or freshly grated black pepper. To reduce the cooking and cleaning time even further, you don't even have to complete the pasta on the stove in another pan. You can simply mix the pasta, cheese, black pepper, and pasta water in a large bowl to finish it up. The pasta water will emulsify the cheese to create a creamy sauce while also seasoning the pasta with the salt you previously added to the water.


Cacio e Pepe - Simple 4-ingredient Pasta


Why not give this a try as a simple weekday dinner?


Cacio e Pepe - Simple 4-ingredient Pasta


Cacio e Pepe


Ingredients

  • 16 oz of Spaghetti (or another long thin type of pasta like Linguini)
  • 6 oz of Pecorinio Cheese, grated
  • Freshly ground black pepper to taste
  • Salt to taste (and to season the pasta water)
  • Optional: Eggs

Takes , Makes 4 servings.


Instructions

  1. Bring a pot of water to a boil. Ensure that it's reasonably seasoned with salt before adding the pasta

  2. Add the spaghetti and cook for about 10 minutes or until Al Dente

  3. Bring the cooked spaghetti into a large bowl and slowly incorporate the pecornio cheese while ladling in the leftover pasta water. Stir well to allow the hot water to emulsify the cheese.

  4. Add a generous amount of freshly cracked black pepper. Mix well to infuse pasta with the pepper. If needed, season with salt to taste.

  5. Add a poached egg on top if desired (Please refer to the above "Poached Eggs Tips and Tricks" section for extra guidance).
  6.  


Note:  This recipe is intended for simplicity. Please feel free to improvise off of it and to add your own twist with other ingredients!


I've been ignoring food content on my blog for a while now, so I hope this post was a breath of fresh air. I've mostly been focused on trying to present everything I collected in Italy in an organized manner, so I've been spending large amounts of time editing travel vlogs and photos. I still have some content on Italy left, but they're mostly going to be fashion-related. If you're interested on the Italy content, please visit the new travel section I created—filled with travel tips, ideas, and oh so many food recommendations.

I also have some video content coming out for recipes, so please subscribe to my YouTube Channel to stay updated!

Please try this out if you're looking for a simple meal to make. It literally takes no time at all and is super delicious :)

♥ Cindy

 
Food, 2Cindy ZhangComment
Mochi Cupcakes
Mochi Cupcakes

Follow me on Instagram @cinders_zhang for more cooking demos/recipes!


With spring here in full action, and 3284323576 of my colleagues and friends jetting off to Tokyo and posting photos of their Japanese treats on Instagram, I found myself craving mochi and matcha all the time. I was also bombarded with photos from Third Culture Bakery in Berkeley, which specializes in mochi muffins and Japanese sweets. So with cravings came curiosity, and I decided to do a little bit of research on desserts I could make with the Mochiko rice flour I had lying around.


Mochi Cupcakes - Matcha and Plain stuffed with cookie butter and jam


I attempted to recreate the mochi muffins at home—though I consider them to be "mochi cupcakes" because of how dainty and light they are. Several recipes online suggested using coconut milk instead of regular milk, and I found that the lighter, more refreshing flavor of the coconut was a great match for the heavier, more intense flavor of the matcha.

I tried a total of four different flavors. At the very top you can see the matcha mochi cupcakes with no filling. The plain ones were stuffed with passionfruit jam, guava jam, and cookie butter.


Mochi Cupcakes - stuffed with cookie butter


Prior to baking these, I happened to stop by Trader Joes and brought home a jar of cookie butter. If you haven't had cookie butter, well, what are even you doing reading this blog? You should be rushing to TJ's right this moment to buy a jar and experience your life change. Anyways, since I had an entirely new jar of cookie butter at my disposal, I couldn't help by try to incorporate it into these as well.

I purchased my guava and passionfruit jams from Nijiya Market. Before I discovered that Nijiya carried guava jam, I resorted to amazon to purchase guava paste and guava jam (which I used to make these guava pastries). Now I can simply make a trip to Japantown and find not only guava jam, but also the other exotic pineapple, passionfruit, papaya, and strawberry-guava jams by Hawaiian Sun.


Before adding the top layer of batter to cover each cupcake, I scooped a teaspoon of jam and cookie butter into each the plain mochi cupcakes. I found that the passionfruit and guava also worked really well with the faint coconut flavoring from the milk to create a tropical flavor. As for the cookie butter, well, I think we can all agree that goes with everything.


Mochi cupcakes - Matcha


Instead of going out of my way to buy actual matcha powder, I cheated once again with an instant latte mix. If you've read my previous dessert posts, you'll know I'm quite a big fan of instant coffee and latte mixes and find them to be an easy but creative addition to a lot of different baked goods (you can see how I incorporated a cafe latte mix into my chocolate cheesecake cupcakes). I added a total of 2 small packets of instant matcha to my batter and I found it to be a bit less scary than adding raw matcha due to its strong flavor and coarse texture that may easily overwhelm the cupcakes.


Mochi Cupcakes - Matcha


The matcha flavored cupcakes had a nice, subtle green tint to them when they came out of the oven. To add a little more pizzaz to them, I dusted powdered sugar on top. The color scheme reminds me a little bit of Christmas. In fact, I'm sure you could just add a raspberry or strawberry on top to make these work for the holiday season. I know, I know, we still have a long ways to go till Christmas—but I'm letting you know in advance just in case.


Unfortunately, I ran out of cupcake liners and had to add the batter directly to the cupcake pan—so a few of plain ones turned out a bit flatter and more golden on the sides than the ones at the start of this post. But no worries—just remember to spray your cupcake pan with cooking spray before you add your batter. Also remember to wait for your cupcakes to chill before you flip them out of the pan. Difficult, I know, especially because these smell so damn good when they first come out of the oven. The cookie butter ones were the most popular amongst my family and friends, whom I ended up gifting these to.


Mochi Cupcakes - Cookie Butter


Mochi Cupcakes


Ingredients

Plain Mochi cake:

  • 3 cups Mochiko Rice Flour
  • 1 1/4 cups sugar
  • 3 cups coconut milk (can replace with regular milk)
  • 3 eggs
  • 1/2 cup butter
  • 1 tsp vanilla extract (optional)
  • Powdered sugar (optional)

Fillings:

  • 2 packets of matcha (optional)
  • Passionfruit jam (optional)
  • Gava jam (optional)
  • Passionfruit jam (optional)

Takes , Makes 12 for a standard cupcake pan.


Instructions

  1. Pre-heat the oven to 350˚F (148˚C).

  2. Line a standard cupcake/muffin pan with baking cups. If you're adding the batter directly to the pan without the baking cups, make sure to grease your pan with cooking spray or butter so the cakes come out easily after baking.

  3. Combine all the wet ingredients (sugar, coconut milk, eggs, butter, and vanilla extract) together. Slowly add the Mochiko rice flour and mix until fully combined

  4. (Option 1) If you're making a batch that are matcha flavored, add in the two packets of the instant matcha latte mix and mix well.

  5. (Or, option 2) If you're planning to add fillings, fill up the muffin 1/2 of the way with the batter. Add 1-2 tsp of jam or cookie butter to each cup, then add more batter to cover the filling, until each is filled 3/4 of the way.

  6. Bake for 30 minutes, or until a toothpick comes out clean.
  7.  
  8. Do note that they are very delicate when they first come out of the oven, so wait until they're cool before taking them out of the muffin tin. Finish by dusting with powdered sugar.


Recipe adapted from Sugar and Cloth


For more cooking:


Sorry about my inactiveness this month on the blog! Work being a hot mess and practicing for various gigs has got me sleeping at around 2-3AM every night. So finding time to compose posts like this is quite the challenge. Hopefully May will be a better month :)

♥ Cindy

 
Food, 2Cindy Zhang Comment
Simple Chinese Cold Noodles


This recipe was originally inspired by what my mom used to make for me and my brother on hot summer weekends. This is the perfect dish to make when you're short on time, and don't have too many ingredients in the fridge—which is why I adopted this recipe as a college student, and even now, as a working adult. I don't know if this is true for all Chinese families, but my family in particular likes to make complicated lunches, but keep dinners very simple. We'll usually have rice and several dishes for lunch and then have dumplings or noodles for dinner. For weekend dinners, my mom literally tosses this up in 10-15 minutes. As for me—well, I still have a long ways to go to get to her level.


Simple Chinese Cold Noodles


This later transitioned from a family dinner item to an item I would always bring with me to school for lunch. You may consider this a risky option, based on what other kids might think. After all, I went to a high school located in Scripps Ranch, which is a neighborhood that's 70% white. Luckily for lunch I always either hung out in the band room or in my math teacher's classroom with the friends I met in Japanese class. They did not make fun of my lunch. In fact, they usually ended up eating half of whatever I brought.

Maybe half is exaggerating, but they did really enjoy it. I ended up making this for my friends whenever we hung out after school because it was just so simple. Making this once again for the blog made me feel really nostalgic. I realized just how much I missed hanging out with my high school friends in San Diego... and spending relaxing summer nights with my family without having to worry about the stress of work the next day.


The noodles are tossed in a simple "dressing" made with soy sauce, chili oil, sesame oil, and—if you're feeling fancy—a little bit of peanut butter. I like to microwave the soy sauce for around 20 seconds before adding the peanut butter. This helps the peanut butter dissolve and mix well with the rest of sauce.

As for the chili oil, I was actually lucky enough to use one that my dad made from scratch. He fries dried red peppers, Sichuan peppercorns, star anise, and bayleaves together with vegetable oil, and then drains out all the other ingredients until only the oil is left. This chili oil can then be used for all sorts of dishes—mapo tofu, as a dipping sauce for dumplings, noodles, soups, and more.


The toppings can be anything you have in the fridge, really—but my mom and I usually top the noodles off with a spicy stir fry made with ground pork as the main ingredient. Usually if I want to be healthy—or if I want to make this dish vegetarian—I will chop up some oyster mushrooms and stir fry it with tofu instead. Get creative and make the most out of whatever you have left in the fridge. Day after Thanksgiving? Use your leftover Turkey! I would just advise to cut up whatever ingredients you decide to use into small pieces so that they can evenly distribute in the noodles once you mix them in.


Simple Chinese Cold Noodles


And that's basically it! If you want to create a "noodle bar" of some sort, you can skip the step of adding the toppings directly to the noodles. If you want to make everything vegetarian friendly, and let your guests decide what they want to top the noodles off with, just give everyone a bowl of noodles and let them decide what to add. You can also chop up some cucumbers and lay out some cilantro for your guests if they'd like to garnish. Chopped peanuts are good options too!


Simple Chinese Cold Noodles


Does the above photo look a little naked (or "nood") to you? See what I did there? :-) It's because it's missing an egg, of course! Honestly, I've never met someone who, when asked, "do you want this dish topped off with an egg?" (free of charge), responded with "no thank you". Also, noodles and eggs go together like peanut butter and jelly. If ramen can have a soft boiled egg, and bibim naengmyun can have a hard boiled egg, then these Chinese cold noodles can have a sunny-side-up egg as well. In fact, it doesn't even have to be sunny-side-up. Top this off with a poached egg to take it out of Chinatown and make it restaurant quality.


Simple Chinese Cold Noodles


Simple Chinese Cold Noodles

Ingredients


  • 500g egg noodles or soba noodles
  • 1 egg (optional)
  • Sesame Seeds for garnish
  • The stir fry on top:

  • 1 lb (around 450g) ground pork or ground beef
  • 1 tbsp cornstarch
  • 1 tbsp oyster sauce
  • 1 tbsp soy sauce
  • 1 tsp Chinese black vinegar
  • 1 slice of baked tofu
  • Scallions
  • Sauce for the noodles:

  • 2/3 cup light soy sauce
  • 1/4 cup Sichuan chili oil
  • 1 tbsp sesame oil
  • 2 tbsp peanut butter
  • 1 egg

Takes , Makes 4 bowls.

Instructions

  1. Bring a pot of water to a boil and add in the noodles. Cook until the noodles are al dente (cooking time might differ based on the type of noodle used)

  2. Strain the noodles and run them under cold water while they are still in the strainer. The cold water will stop the cooking process and make sure that the noodles stay al dente and do not become soggy. Place the noodles in the fridge to chill while you make the sauce and toppings

  3. For the stir fry topping, combine the ground pork with the oyster sauce, soy sauce, vinegar, and cornstarch (adding corn starch to the meat will make the stir fry gooey and create a sauce underneath, which is perfect for topping off the noodles). Set aside to marinate

  4. Heat oil in a frying pan and add the meat when the pan becomes hot. Stir fry until the meat is cooked and a gooey sauce has formed underneath. Add more water mixed with cornstarch if you want the stir fry to produce a thicker sauce. Add the chopped baked tofu and scallions and stir fry until everything is well combined and cooked through

  5. To make the dressing for the noodles, first heat up the soy sauce for 20 seconds in the microwave. After it's heated, allow the peanut butter to dissolve in the soy sauce. Mix in the chili oil and sesame oil. Top off with sesame seeds and chopped scallions if desired
  6.  
  7. Take the chilled noodles out of the fridge and add the sauce. Toss the noodles in the sauce and make sure it's well combined

  8. Fill a bowl with 1/4 of the noodles and top it off with the stir fry. Add a sunny-side-up egg and garnish with sesame seeds and leftover scallions

 
Simple Chinese Cold Noodles


If you're a bit weirded out by the peanut butter in the sauce, I want to point out that the chili oil + peanut butter combination makes these noodles reminiscent of dan dan mian. Feel free to replace the peanut butter with sesame paste as well if you don't like the idea of Jif being in your noodles.

Shout out to my mom for giving me the inspiration to steal one of her dishes and taking my own spin on it. And shout out to my high school friends whom I miss so so much. I'll make this again for y'all someday :')

♥ Cindy

 
Food, 2Cindy ZhangComment
Raspberry Cheesecake Chocolate Cupcakes


You may think I'm a weirdo for saying this, but I'm not a big fan of desserts that are head-to-toe drenched in chocolate. I feel that the flavor can get a bit overwhelming, especially when you have a chocolate base from a chocolate cake, chocolate fillings from chocolate chips, and chocolate toppings from frosting and syrup. Luckily, there are two ingredients that pair wonderfully with chocolate that help balance the rich flavor: cream cheese and raspberries. The tanginess of cream cheese and tartness of the raspberries help cut through the rich sweetness of the chocolate. You can see a myriad of raspberry + chocolate desserts and cheesecake brownie recipes all over the internet these days—as well as menu items at restaurants and bakeries. 


Raspberry Cheesecake Chocolate Cupcakes


So I thought... why not combine the two? Raspberry cheesecakes are also a thing, so you're literally getting the best of three (!) worlds. The motivation to try to make something like this actually came from craving a certain black bottom cupcake from a bakery that always runs out of them. This happened with the guava pastries too. Guess I'm always craving what I can't have...

Oh! I should mention I brought another ingredient into the mix for the chocolate cupcake at the bottom, just to add an interesting kick:


Raspberry Cheesecake Chocolate Cupcake Recipe


And -drum roll- that ingredient is... instant coffee! You might have a bad impression of instant coffee, but Asian coffee brands do these instant latte mixes really well. For example, UCC coffee has a cafe au lait mix (pictured above) that you can just mix into hot water without milk and even a creme brulee latte mix that tastes absolutely delicious. Because there's sugar combined in the instant coffee mix already, you won't have to worry about the instant coffee making your batter bitter.

You can purchase these kinds of instant coffee mixes from most Asian grocery stores. I got mine from Nijiya Market.


I don't care if you hate the word moist—I'm going to use this word a lot in this post. It's a perfectly valid term to describe a delicious cake. In my case, I think chocolate cakes are best when they are super moist. To ensure that the cake is moist, it's important that you add adequate amounts of oil, water, and butter. I took the proportions from this recipe, and added two extra tablespoons of butter just in case. Because extra butter doesn't hurt (your tastebuds, at least). And we all know butter is at the bottom of the food pyramid, obviously.

I sectioned off my box of raspberries among the cream cheese topping mixture and the chocolate cake mixture. Adding raspberries to the mixture will help add that extra bit of moisture to the cake.


Raspberry Cheesecake Chocolate Cupcake Recipe


Fill up each cupcake two-thirds of the way with the chocolate cake mixture, then top it off with the cream cheese mixture. This will create a beautiful shiny top to each cupcake—so you can ditch the frosting and the piping bags.  You can check if the cupcakes are ready by sticking a toothpick into a cake and seeing if it doesn't pick up the chocolate filling (seeing the cream cheese on the toothpick is normal).


Raspberry Cheesecake Chocolate Cupcake


Raspberry Cheesecake Chocolate Cupcakes

Ingredients


Chocolate cake:

  • 1 cup flour
  • 1 cup sugar
  • 1/3 cup unsweetened cocoa powder
  • Half a packet of instant coffee mix (optional, Asian brand preferred)
  • 1 tsp baking soda
  • Pinch of salt
  • 1/2 cup milk
  • 1/2 cup oil
  • 2 tbsp butter
  • 1/2 cup hot water
  • 1 egg
  • 1 tsp vanilla (optional)
  • 1/2 box of raspberries

Cheescake topping:

  • 8 oz box cream cheese
  • 1/3 cup sugar
  • 1 egg
  • 1/2 box of raspberries
  • Takes , Makes 14.

    Instructions

    1. Pre-heat the oven to 300˚F (148˚C). Take the cream cheese out of the fridge to soften

    2. Mix all the dry ingredients (flour, sugar, cocoa powder, instant coffee, baking soda, and salt) together. If you're adding an instant coffee mix that is sweetened, subtract a tablespoon from the cup of sugar to ensure the cake isn't overwhelmingly sweet

    3. Heat the 1/2 cup of water and dissolve 2 tbsp of butter. Combine the water and butter mixture with all the other wet ingredients (milk, oil, egg, vanilla)

    4. Combine the dry mixture with the wet mixture and whisk until the mixture forms into a ribbon-like texture, making sure that everything is well incorporated and that there are no lumps

    5. Slice the raspberries into halves and carefully fold in half into the chocolate cake mixture, saving the other half for the cream cheese topping
    6.  
    7. For the cheesecake topping, combine the cream cheese with the sugar and egg. Carefully fold in the second half of the raspberries

    8. Fill a cupcake pan with liners. Fill each cup two-thirds of the way with the chocolate cake mixture, then top off each cupcake with the cream cheese mixture, making sure to leave a little space at the top (since the cupcakes will rise)

    9. Bake in the oven for 20-25 minutes. You can check if the chocolate cake is cooked through by sticking a toothpick into a cake and seeing if it doesn't pick up the chocolate mixture (seeing the cream cheese on the toothpick is normal)


Raspberry Cheesecake Chocolate Cupcake


I brought these into the office and they were gone in a blink of an eye... I'm actually quite sad since I only had one and wanted more ): But according to my coworkers, the cake was indeed very moist!

These actually would've been great for Valentines Day! Maybe next year I'll make them for somebody—or even better, someone can make these for me ;) That's just a hopeful dream at this point.

♥ Cindy

 
FoodCindy ZhangComment
Japanese Breakfast
Japanese Breakfast


Goodbye pancakes and bacon: move aside and make room for a tastier and healthier alternative: Traditional Japanese Breakfast! I recently visited a brunch spot in San Francisco called Bon, Nene that served this kind of breakfast set, and felt myself feeling quite salty at the end after spending $18 + tax and not feeling very full. So a few weeks ago I headed over to Nijiya market in Japantown to pick up some ingredients to make my own Japanese Breakfast for two (definitely under $18). Shout out to my teammate Emma for eating my creations :)


Japanese Breakfast


Otherwise known as 朝食 —choushoku—or 朝ご飯 —asagohan—a traditional Japanese breakfast consists of a variety of fresh ingredients that contribute to a colorful spread (looks like I still remember a bit of Kanji from HS Japanese!). A set will usually contain Miso soup, steamed rice, some kind of grilled fish (yakizakana), rolled egg omelette (tamagoyaki), and more adventurous items like natto (fermented soybeans) and umeboshi (a kind of pickled plum).

Despite the health benefits of natto, I'm not a big fan and so I left it out of the meal. I also replaced the rather sour umeboshi with some sautéed zucchini and enoki mushrooms to fulfill vegetable portion of meal.


My Japanese breakfast consisted of (from left to right, top to bottom):  Miso soup, sautéed zucchini and enoki mushrooms, oven-baked salmon, onigiri, and tamagoyaki. These were all fairly easy to make, and I'll try to summarize the recipes to the best of my ability. Do note that I rarely measure ingredients when I'm cooking (as opposed to when I'm baking), so please season everything according to your own taste buds!


Baked Salmon
Baked Salmon


Oven-baked Salmon

To make the salmon, lay the filets skin side up on a sheet of parchment paper over a baking tray. Sprinkle with salt and pepper put inside a 350˚F (177˚C) oven for around 20-25 minutes, depending on how well-done you'd like it to be. Because I like my salmon a little more rare, I usually will turn off the oven around the 15 minute mark and leave the salmon in the oven for another 5-10 minutes. After taking it out of the oven, I served it with 2-3 pieces of shiso leaf underneath.

Because I love salmon sashimi so much, and because salmon has enough flavor to stand on its own, I try not to do too much when I'm seasoning it. Salt and pepper (and a little bit of olive oil if you're feeling fancy) is totally sufficient to season a fresh piece of salmon.


Tamagoyaki


Tamagoyaki

It's quite difficult to explain how tamagoyaki achieves its shape in words, so I'll link you to this video which taught me how to make it (if you love this YouTube channel as much as I do, let's talk). It helps if you have a square pan, but the overall shape is still totally achievable with a circular pan. Your rolls will just end up looking a bit uneven on the sides like mine. My egg mixture included 4 eggs, scallions, a pinch of salt, and a pinch of sugar.


Onigiri


Onigiri

Next up on the menu is onigiri, or rice balls that contain a variety of fillings such as salmon or umeboshi. I unfortunately didn't put too much effort into making these since the triangular ones are quite difficult to shape. To simplify the process a bit, I rolled my onigiri into circles and coated them with furikake. I used two kinds of furikake: one containing bits of umeboshi seasoning and a plain one consisting of seaweed and sesame seeds.


To make these, start off by cooking a cup of sushi rice. Set aside to cool after it's cooked to risk burning your hands. Separate into two portions and mix in the furikake seasoning into each portion. To shape the onigiri, wet your hands and sprinkle on some salt to prevent the rice from sticking to your palms. Roll them into spheres and you're done!


Japanese Breakfast


Miso Soup

To make the miso soup, I brought 3 cups of water to a boil and stirred in 2 tablespoons of dashi miso. Add sliced tofu, seaweed, and chopped scallions at the very end. I learned this bit from my mom: if you're cooking any kind of soup with vegetables, always put them in at the very end for them to retain their green color and freshness.

I learned how to make miso soup from this video, which I suggest watching before you attempt it. It suggests that you use dashi as the soup base, which is also quite simple to make by boiling  water with bonito flakes and then straining them out of the broth.


Japanese Breakfast


Though Bon, Nene didn't impress me very much, another option for Japanese breakfast I actually enjoyed was at a place called Casava. If you don't want to wander too far into the Richmond district, a great option closer to downtown is Samovar Tea Lounge, which serves a lot of healthy breakfast items with their wide selection of teas. Or... you can try making this at home like I did! Most of the recipes are simple enough and have a low chance of failure ;)

♥ Cindy

 
FoodCindy ZhangComment