Posts in 2
Parmesan & Butter Risotto with Shiitake Mushrooms


A warm and creamy risotto is the perfect comfort food to warm you up on a cold winter’s day. It only takes a few ingredients to make, and can be made vegetarian by substituting the chicken broth with vegetable broth.

People are often scared to make risotto because of how easy it is to screw up without watching it like a hawk. And they’re not wrong—you do have to keep on stirring it for a good 20 minutes or so for the consistency of the rice to be right. I usually like to take this opportunity to cook an easy side dish like roasted vegetables in the oven while I give the risotto my undivided attention.


Risotto with Shiitake Mushrooms


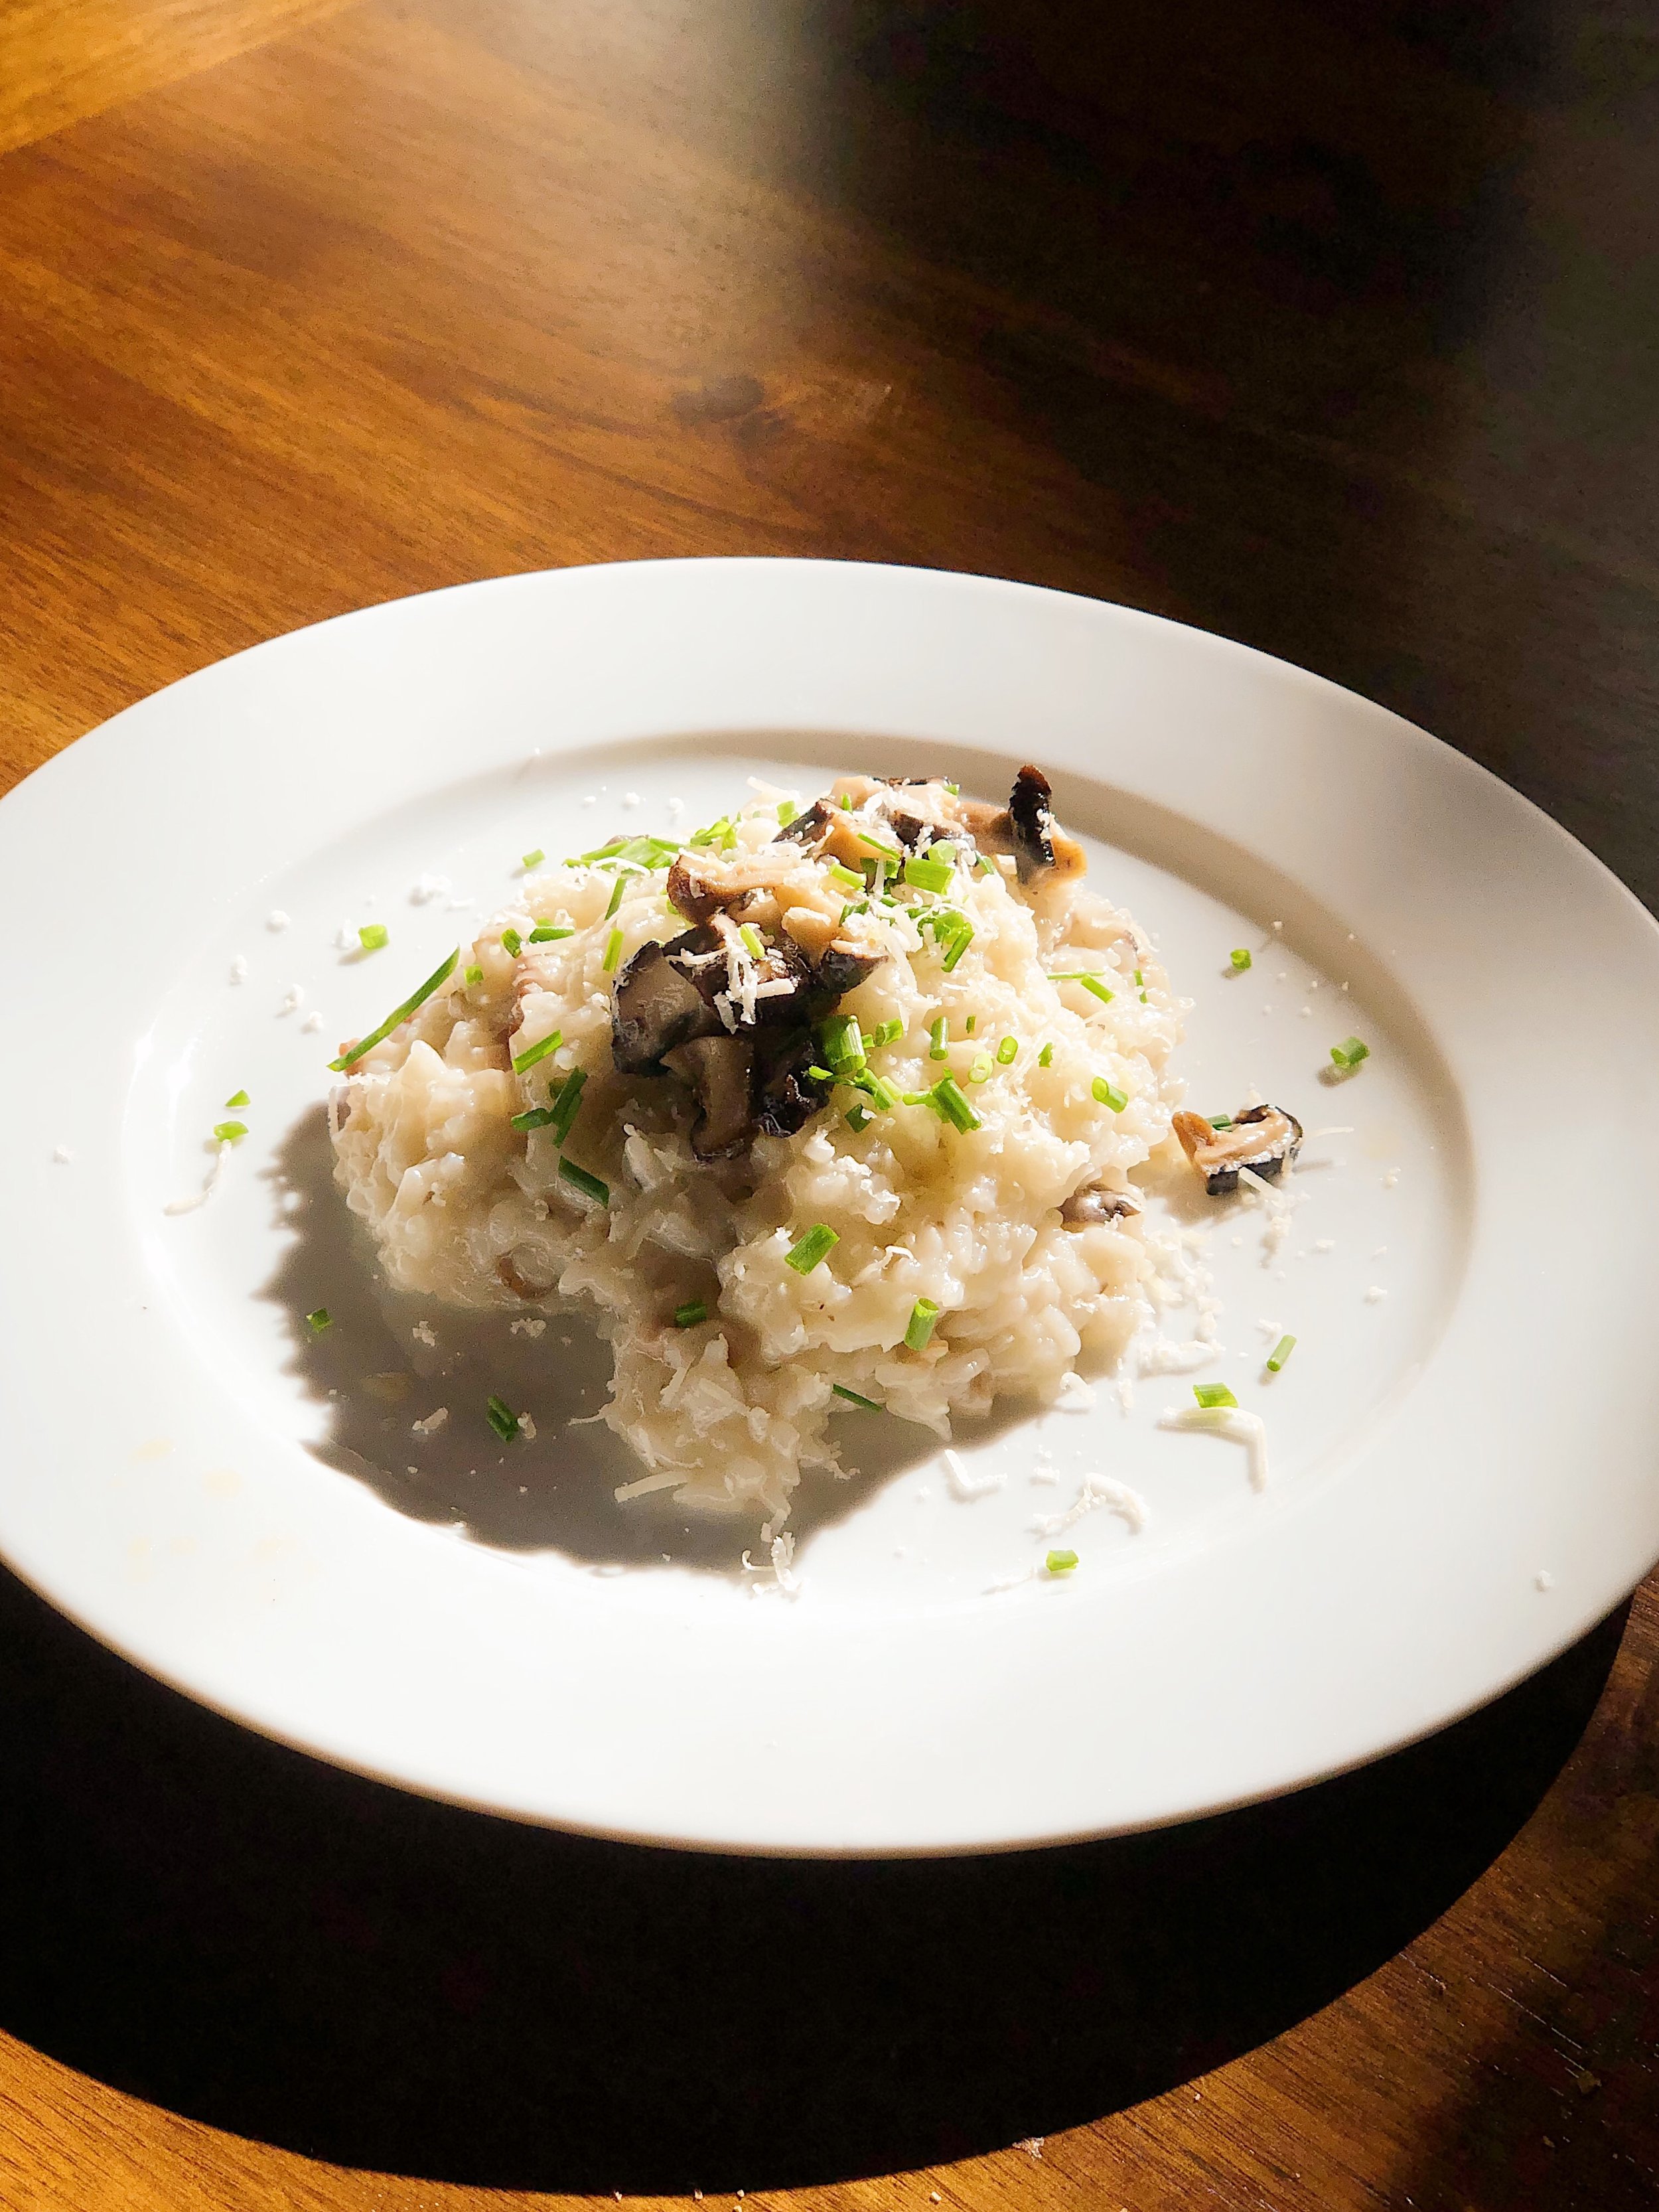
Risotto, like pasta, is super versatile and makes a great backdrop to all sorts of toppings like seafood and veggies. I decided to top mine with dried shiitake mushrooms (an Asian favorite!), rehydrated in chicken stock and then toasted in the oven with olive oil. Mushrooms and risotto are a classic pairing, and for those that are feeling really fancy, you can also finish off your risotto with truffle oil or truffle shavings.


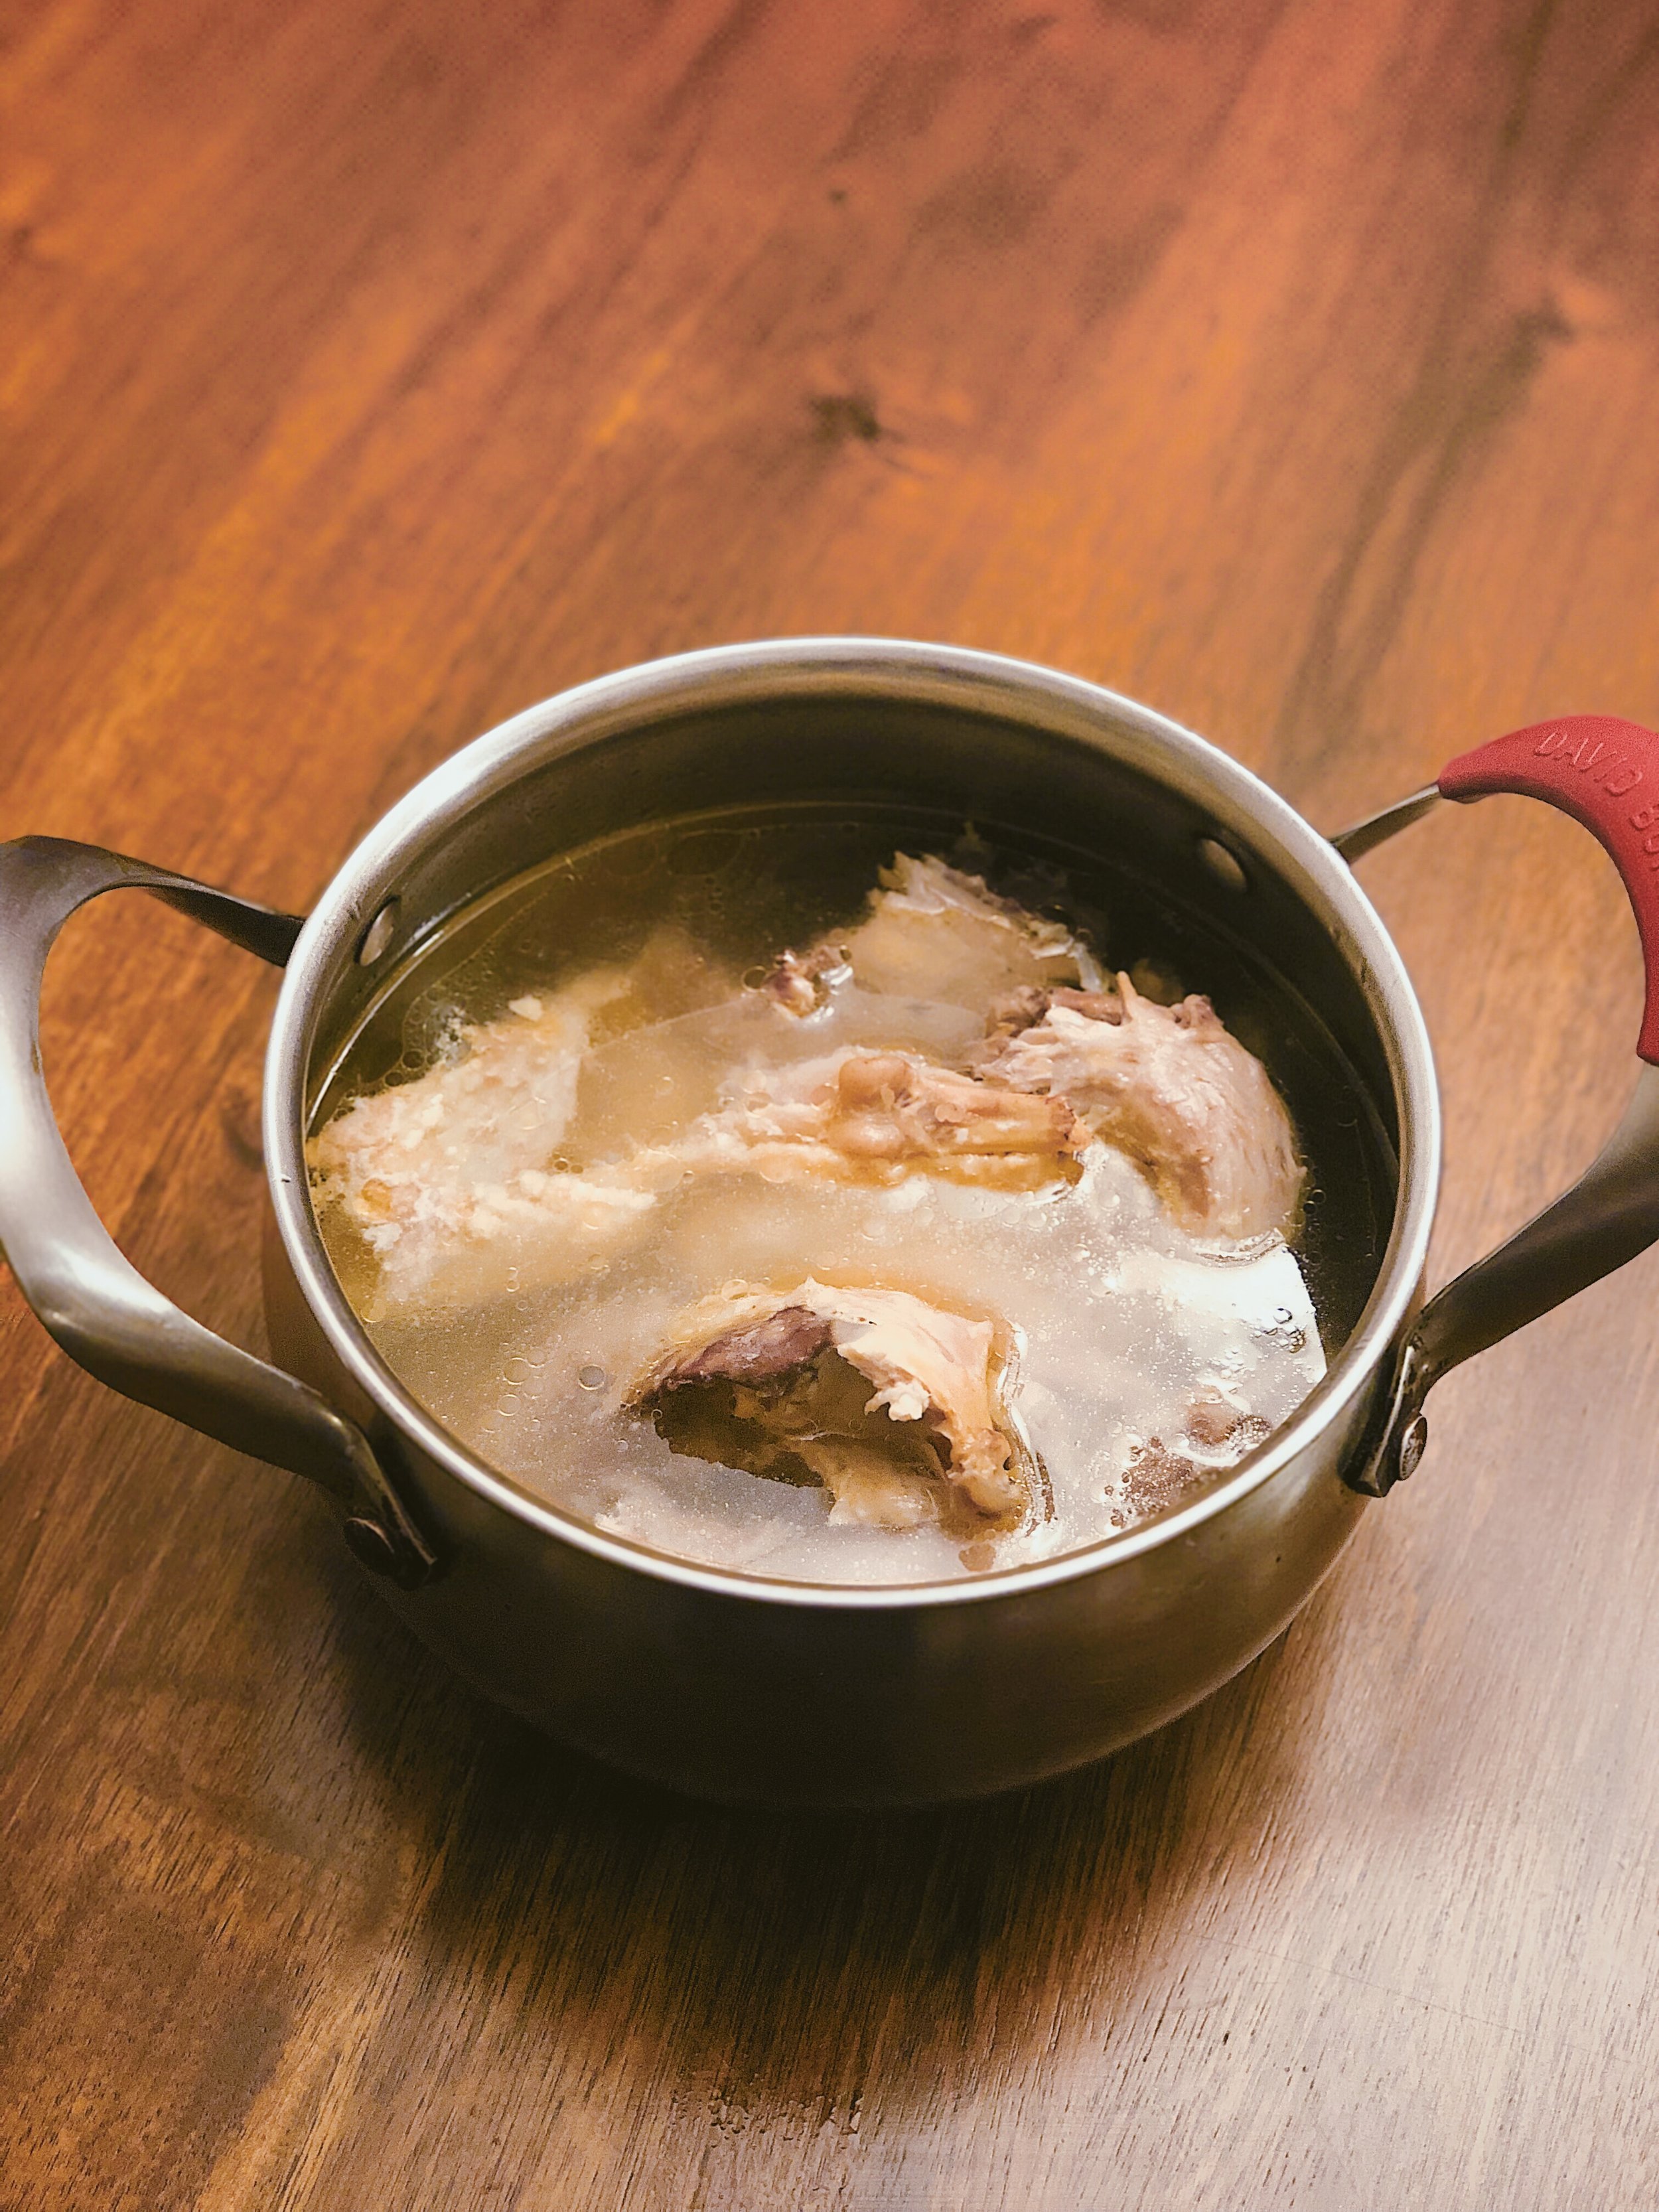
I made my risotto with my mom’s homemade Chicken broth, which is super simple to make. She doesn’t add any herbs or spices to the broth, since a traditional Chinese chicken broth is pretty light in flavor and is focused mostly on the Chicken flavor. To make this simple broth, add a whole cleaned chicken, dried shiitake mushrooms, and water to a slow cooker, and cook overnight (or until the chicken becomes tender). My mom didn’t initially add salt into the slow cooker, since she knew that the broth would be reused for multiple dishes. This way, the broth could be adjusted according to the dish.

Of course, this risotto is totally possible with store-bought chicken broth, or vegetable broth if you’re vegetarian.


Risotto with Shiitake Mushrooms


Parmesan and Butter Risotto with Shiitake Mushrooms

Ingredients (serves 3-4 people)

  • 1 cup arborio or short grain rice
  • 3-4 cups chicken or vegetable broth
  • ½ cup sliced button mushrooms
  • ½ cup dried shiitake mushrooms
  • 2 cloves of garlic
  • 1 shallot
  • 2 sprigs of thyme, chopped finely
  • ½ cup parmesan cheese
  • 2 tbsp butter
  • splash of white wine
  • olive oil
  • salt and pepper to taste
  • chopped chives for garnish

Takes , Makes enough for 3-4 people.


Instructions

  1. Heat up the chicken or vegetable broth and toss in the dried shiitake mushrooms to rehydrate them. After the broth is heated, take out the mushrooms to set aside. Leave the broth on the stove to keep it warm.

  2. Add butter to a nonstick pot or large saucepan and sauté the shallots, garlic, thyme, and sliced button mushrooms. Season with salt and pepper and add a drizzle of olive oil. Add the uncooked rice to the pan, covering it with the vegetables, butter, and seasonings. Add the white wine and cook until it's semi-evaporated.

  3. Start ladling in the warm chicken broth in half-cup increments. Make sure you don't add too much broth, or your risotto will end up like a porridge or a soup. Stir the rice with the broth constantly, until some of the liquid has cooked into the rice or evaporated, then continue the process with more broth.

  4. When you're finally finished stirring most of the chicken broth into the rice—or until your rice is fully cooked through (to the texture of your liking)—melt another tbsp of butter into the rice to get that rich, silky texture. Melt half of your portion of parmesan cheese into the rice as well, if you like your risotto to be creamy and cheesy. If the parmesan cheese hasn't provided enough saltiness to your risotto, feel free to mix in more salt and pepper.

  5. Take your pan off the heat and put a lid over your risotto. Chop up the shiitake mushrooms you previously set aside, toss them in a bit of olive oil and salt and pepper, and pop them into a 450° F oven for about 3-5 minutes until they're nice and toasted.

  6. Spoon the risotto onto a plate and top it with the toasted mushrooms. Drizzle with more olive oil if desired, and garnish with parmesan cheese and chopped chives.


This is the perfect restaurant-style dish to make for Valentine’s Day! (Okay… maybe try it out a few times first and make sure you’ve nailed it before you try to impress your special one) Good luck in the kitchen, and please tag me @cinders_zhang on Instagram if you end up making it :)

♥ Cindy

 
Food, 2Cindy ZhangComment
24 Hours in London
London in 24 Hours - Notting Hill


London was the first city I ever visited in Europe, and it’s considered a great starting point to the rest of Europe not only because of language, but also its convenient underground subway system. If you’re short on time and only have a day in London, don’t fret: this city’s totally possible to tackle in a day. Here’s an itinerary to explore London in less than 24 hours, planned out with each location not too far from the next:


London in 24 Hours - Tower Bridge Tour


10:00 AM - Tower Bridge tour

Visit Tower Bridge early in the morning, when it’s the least crowded. If time permits, try to head up and walk along the top level where there’s a glass floor from which you can see all the traffic on the bottom level. You can even catch the bridge open up for ships as they pass through.


London in 24 Hours - Leadenhall Market


12:00 PM - Grab a quick bite at Leadenhall Market

Situated just a mile north of Tower Bridge is Leadenhall Market, a Victorian-style retail center full of shops, cafés, pubs, and casual restaurants. You can usually catch Londoners day-drinking here during their lunch breaks, watching the game together (I was there during world cup season). If you’re a Harry Potter fan, this market might seem vaguely familiar to you, since it was actually the filming site to Diagon Alley.


London in 24 Hours - Notting Hill


1:30 PM - Portobello Road Market in Notting Hill

For a taste of London’s local scene away from the bustling city, escape to the famous Portobello Road Market in the charming neighborhood of Notting Hill. You can find a huge array of discounted treasures there—antiques, books, vintage dresses, old jazz records, and street foods, just to name a few. Once you’re finished with the market, get some Julia Roberts + Hugh Grant vibes in the market’s enclosing neighborhood of Notting Hill, a quiet and residential area filled with colorful victorian-style houses. London is known for its fast-paced lifestyle, but Notting Hill is where it all slows down.


London in 24 Hours - Afternoon Tea


3:00 PM - Afternoon Tea

While in England, treat yourself to the luxurious experience of having Afternoon Tea (which is oh so much more than tea). We chose to have our tea at The Orangery, a restaurant inside the Kensington Palace that overlooks its gardens. We ordered the “Pavilion Afternoon Tea,” which came with two types of teas and a gorgeous 3-tiered selection of goodies to go along with the tea: finger sandwiches, small curry wraps, scones, and desserts comprised of teacakes, macarons, and tarts.


London in 24 Hours - Carnaby Street


5:00 PM - Shop at Carnaby Street

Head to London’s West End and shop at Carnaby Street. It encloses an eclectic mix of global brands and independent stores, along with loads of restaurants, cafés, and bars. The West End is a huge hub for shopping, but I found Carnaby Street to be the most quirky with its super artistic storefronts and trendy streetwear brands.


London in 24 Hours - London Eye
London in 24 Hours - Parliament from the London Eye
London in 24 Hours - London Eye


6:30 PM - Catch a sunset on the London Eye

In the evening, catch a ride on the London eye to get a panoramic view of the Thames and Parliament from above. If you’re lucky and it’s not raining, you can even try to catch the sunset. The pod that you ride in is spacious and completely surrounded by glass, so you can get a comprehensive view of multiple parts of the city.


24 Hours in London - Westminster Bridge


7:30 PM - Walk along Westminster Bridge

After heading up the London Eye, walk along Westminster bridge and watch the House of Parliament light up along with Big Ben. You’ll also get great views of the London Eye on this bridge. But it’s a place where a huge number of tourists flock to, try to plan your visit later in the evening or early in the morning when it’s less crowded.


London in 24 Hours - Fish & Chips, Bubble & Squeak


8:30 PM - Try out some British staples for dinner

For dinner, we tried out some traditional British dishes such as Fish & Chips (served with mushy peas here… which I wasn’t exactly pumped about) and Bubble & Squeak, which is a potato and vegetable pancake served with eggs. If this doesn’t look too appetizing to you, you should know that the national dish of England is actually Chicken Tikka Masala. This means London is filled with incredible Indian restaurants. I previously had an amazing meal at “Punjab”, London’s oldest North-Indian restaurant, and also heard great things about the more modern “Dishoom.” These highly-rated Indian restaurants are both located in the Convent Garden area in the West End.


London in 24 Hours - Full English Breakfast


7:30 AM - Traditional full English breakfast

Don’t leave London without having one of its most iconic meals: the Full English Breakfast. It consists of common breakfast items like eggs, toast, grilled tomatoes, bacon, and sausage (or “bangers,” as the Brits would say), as well as more traditional English items like baked beans and black pudding. With all of its different components, the Full English can be quite a heavy meal, so consider just getting one plate to share. We had our Full English at the Regency Café, considered one of the best and cheapest spots for a Full English in London. It’s located in the quiet, residential side streets of Westminster, and accepts cash only. Try to head to the café early in the morning to avoid waiting in a long line.


London in 24 Hours - Platform 9¾


9:00 AM - London -> Hogwarts

The best way to leave London is via the Hogwarts Express from Platform 9¾.

… Just kidding. But if you are leaving London via train from King’s Cross or St Pancras International, be sure to stop by Platform 9¾ at King’s Cross, which is really a brick wall with a trolley embedded in it. There are scarves readily available from every Hogwarts house, as well as employees there to help you wave your scarf and take your photo while you pretend to magically leap into the platform. Once you’re done with the photo, you can also purchase fan merchandise like wands and scarves at the Harry Potter Shop located right next door.


Hope you enjoyed this short itinerary and found it useful! I haven’t been back to London in a while, but after watching lots of the Great British Bakeoff and listening to a lot of Tom Misch and Jordan Rakei, I’m really itching to cure my Anglophilia by going back.

♥ Cindy

 
Travel, 2Cindy Zhang
The Paris Bucket List


Bonjour! It’s been a minute since I visited Paris, but after rummaging through my hard drive, I realized I actually had some great photos left over from my graduation trip!

Paris was one of the first cities I visited after graduating from college, and it was without a doubt the most hectic and intimidating travel destinations I’ve ever come across. But with Amélie and The Devil Wears Prada as two of my favorite movies, I completely geeked out the moment I arrived. Here’s a list of things I think you should do when you visit, as well as some tips and gotchas for each location.


The Paris Bucket List
 

Climb the Arc de Triomphe


Get a panoramic view of Paris on top of the Arc de Triomphe. Like many other attractions around Paris, the Arc de Triomphe does not have an elevator, which means you’ll have to climb up its 284 steps to get to the top. You’ll be rewarded at the end of your climb with a stunning view of the Champs-Élysées, which is an avenue filled with cafés and luxury shops.


The Paris Bucket List


Vist the Sainte Chapelle

Sainte Chapelle stands out as one of the most dazzling churches in Paris because it’s surrounded in every corner with stained-glass windows. Try to plan your visit on a sunny day to see the light pouring in from all directions.


The Paris Bucket List - the best crepes at Au p'tit grec!


Have these must-eat Parisian Treats

Crepes: According to my friend who studied abroad in France, Au p'tit grec—located next to Sorbonne University in the Latin Quarter—is arguably the best place to get a crepe in Paris. After eating there myself, I can definitely confirm that statement. This hole-in-the-wall creperie serves both savory and sweet crepes with gooey centers and crunchy exteriors. Expect to wait in line amongst locals and tourists alike to get your hands on one of these delicious street foods.


Paris Bucket List - the best pastries at Du pain et des Idees


Pastries: For the best pastries, the same friend recommended a bakery called Du pain et des Idées. Get the "Escargot Pistache" if they have it—it's not really escargot, just a buttery and flaky (snail-shaped) pastry filled with pistachios and chocolate.


The Paris Bucket List - Palace of Versailles


Take a day trip to the Palace of Versailles

Venture out of the city to visit the Palace of Versailles. There you can explore the beautiful Hall of Mirrors and the lavish quarters of Louis XIV. Be prepared to do a lot of walking, as this residence is filled with huge gardens and numerous palaces (hey, the royals probably can’t stand each other and need their personal space!). Prepare to spend an entire day getting lost inside this lavish “estate”, which is realistically the size of a small town.


The Paris Bucket List - Palace of Versailles


Getting to Versailles from Paris

The cheapest way to get to Versailles from Paris is by train. Round trip tickets cost about 7 Euros per person. Just head to your nearest Metro station and hop on the train to the “Versailles-Château: Rive Gauche” stop.


The Paris Bucket List - Paris Jazz Clubs


Enjoy intimate concerts in Parisian Jazz Clubs

Stray from the standard tourist path and enjoy a drink and performance in Paris’s many jazz clubs. Jazz and Bossa Nova are huge in Paris, and you’ll find loads of locals sipping away in the basement of restaurants or bars enjoying music in a super intimate setting. American jazz standards are the most popular repertoire, and some of the musicians themselves are American and will speak English throughout their entire set. Some of my favorite venues were 38 Riv, New Morning, and Sunset Sunside.


The Paris Bucket List - The Louvre


Get lost in the Louvre

When you’re ready to be touristy again, head on over to the Louvre, which contains one of the largest collections of art in the world. The Louvre’s size can seem intimidating and it can take hours to explore the entire thing—so set aside plenty of time for it. The museum is literally a walk through history and is filled with famous masterpieces from around the world. One of my favorite exhibits was the Napoleon III Apartments, which is filled with lavish decor and furniture and is slightly reminiscent of Versailles. It hints that the Louvre was actually a royal palace before it became a museum.


The Paris Bucket List - Mona Lisa


Say hi to the Mona Lisa

Because the Louvre is a major tourist destination, buy your tickets ahead of time and visit when the museum first opens at 9AM. Hurry in to see the Mona Lisa first, since this particular gallery will be flooded with hordes of people and their selfie sticks later in the day.


The Paris Bucket List - top of the Eiffel Tower
The Paris Bucket List - Eiffel Tower light show


Head up the Eiffel Tower at night

In my opinion, it’s best to visit the Eiffel Tower at night for 2 reasons: to catch the light show and to see the panoramic nighttime view. Look at the entire city light up as the lift stops on multiple floors. Be sure to keep an eye on your belongings, as pick-pockets love to swarm the area around the tower (especially when you’re in a cramped elevator on your way up).


The Paris Bucket List - Montmartre
The Paris Bucket List - Moulin Rouge


Explore Montmartre and Pigalle

If you’re like me and loved the movie Amélie, then you’ll love the picturesque neighborhood of Montmartre. This area of town is filled with quaint bakeries and cafés and is a great place to take a casual morning stroll. Head up to Sacré-Coeur—a basilica at the very top of the hill—to get one of the best views of Paris and see the Eiffel Tower in context with the rest of the city. Later in the day, head over to the less-innocent Pigalle neighborhood, which is directly at the foot of Montmartre. There you’ll find the famous Moulin Rouge as well as a myriad of bars and restaurants.

… annnnd a bunch of sex shops 🙃


The Paris Bucket List


Stay in a cute Parisian Apartment

Ditch the hotel and stay in a Parisian apartment. I was lucky enough to stay in an artist’s loft which was filled from head to toe with his paintings and sculptures. Most apartments are equipped with the very Parisian windowsill adorned with flowers. However, like the rest of the city, these traditional apartment buildings do not have elevators, which means you’ll probably need to climb some steep, spiral staircases on your way up. Be sure to have the flashlight ready on your phone when you head home at night, since most staircases won’t have its own lighting.


The Paris Bucket List


After creating this post, I am hugely considering going back in the near future. Perhaps on a solo trip this time?

I also forgot to mention, Paris, je t'aime and Midnight in Paris are also a few of my favorite films! And you bet I’m itching to watch them again now that I mentioned them here 😓

♥ Cindy

 
Travel, 2Cindy Zhang
Cast Iron Bacon Fried Rice


Watch the video for a in-depth tutorial on how to make this dish. If you enjoyed watching, please give me a thumbs up/subscribe to me on YouTube!


Cast Iron Bacon Fried Rice


Fried rice is a great way to make use of leftovers and a staple dish in every Asian household. There are so many different varieties: the Korean Kimchi fried rice, the after-Thanksgiving turkey fried rice, or just the basic vegetarian egg fried rice with carrots and peas. So in this post, I thought I’d give it a southern flair by adding bacon, frying the rice in the bacon fat, and cooking the entire thing in a cast iron pan to give the rice a crunchy crust at the bottom—almost like hot stone bibimbap.


Cast Iron Bacon Fried Rice


The idea of bacon fried rice partially came from this YouTube video (which I highly recommend watching): The Untold Story Of America's Southern Chinese, which explores lives of Chinese-Americans living in the Mississippi Delta. The video goes over how they made a living in the Southeast by opening up grocery stores, and delves into the food they ate. Bacon fried rice was one of their signature dishes. Absolutely genius.


Cast Iron Bacon Fried Rice


You’ll need: 2 scallions, 1 cup of peas + chopped carrots, 4 strips of bacon, 4-6 cloves of garlic, 1 tbsp ketchup, 2 tbsp soy sauce, 1 tbsp oyster sauce, 1 tbsp butter, 2 1/2 cups of leftover cooked rice (preferably cold, straight out of the refrigerator), 2 eggs, vegetable or canola oil, salt & pepper to taste, and sesame seeds and paprika for garnish. Feel free to replace the vegetables with whatever you have left over in the fridge. Fried rice is a great canvas to get creative with.

Now, you might think I’m crazy by adding ketchup, but it’s a very common ingredient to add to your fried rice in Asian households. It’s very common amongst me and my other Asian friends to eat eggs with ketchup, and you can also see this combination in Chinese dishes like Stir-fried tomato and scrambled eggs (番茄炒蛋).


Cast Iron Bacon Fried Rice


Cooking with a cast iron skillet might seem a bit scary, but you just have to make sure that it’s well taken care of and seasoned properly. Here’s a super helpful video by Tasty that explains how to clean, dry, and season your skillet. Cast iron might take a few extra steps to clean after, but it’s also very versatile in cooking all sorts of dishes (steak, dutch pancake, pizzas, chicken pot pie… just to name a few) with its advantage of starting something on the stove and finishing it up in the oven.


Cast Iron Bacon Fried Rice


Cast Iron Bacon Fried Rice

Ingredients (serves 2 people)

  • 2 ½ cups of cooked rice*
  • 4 strips of bacon**
  • 2 eggs***
  • 2 scallions
  • 4-6 cloves of garlic
  • 1 cup of peas and chopped carrots
  • 1 tbsp ketchup
  • 2 tbsp soy sauce
  • ½ tbsp oyster sauce
  • 1 tbsp butter
  • vegetable or canola oil
  • salt and pepper to taste
  • sesame seeds and paprika for garnish

* Leftover rice that has been refrigerated (cold and hard) will work best for fried rice. Warm rice straight out of the rice cooker could become mushy in the pan.

** I used a thick-cut uncured style of bacon.

** I use Pete and Gerry's organic free range eggs for their orange yolks.

Takes , Makes 2 servings.


Instructions

  1. Chop the scallions into small pieces on a bias. Set aside a portion of the greener ends for garnish at the very end. Mince the cloves of garlic finely.

  2. Slice the bacon into small quarter-inch pieces.

  3. Fry up the 2 eggs and set them aside to garnish the finished fried rice later.

  4. Fry the bacon in a heated cast iron pan and allow it to render its fat. If it doesn't release a lot of fat, you can add extra oil to the pan. Remove the bacon and drain them on a paper towel, leaving the rendered fat behind in the pan.

  5. Stir fry the peas and carrots in the bacon fat, then add the garlic, stirring constantly to prevent it from burning. Keep the heat on high and add rice to the pan, breaking up the rice and coating it with bacon fat. Keep in mind that in this case, it's okay if the rice sticks to the bottom of the pan. This will create a hot stone bibimbap-style crust.

  6. Add the ketchup, soy sauce, and oyster sauce to the pan, and incorporate them well into the rice. Season with additional salt and pepper if needed after tasting (note that there will be some saltiness coming from the bacon, soy sauce, oyster sauce, and ketchup already).
  7.  
  8. Fold the cooked bacon back in, and wilt the white ends of the scallions into the rice. Turn the heat off, and melt the butter into the rice.

  9. Add the fried eggs on top of the fried rice and garnish with scallions, black and white sesame seeds, and paprika if desired.

  10. Serve in the pan while its still hot, ensuring that the pan doesn't stay on the stove for too long for the bottom crust to become burnt.


Cast Iron Bacon Fried Rice


Again, let me know how it turns out for you by tagging @cinders_zhang on Instagram! Support me by saving this recipe on Pinterest, and subscribing to my Youtube channel :) Good luck in the kitchen!

♥ Cindy

 
Food, 2Cindy ZhangComment
One-pan Pork Belly Carbonara


If you’re anything like me and you hate doing dishes, cooking a pasta dish in one pan is a great way to prepare a meal without worrying about the extra pot of water, straining the noodles, and cleaning up additional kitchen tools. This one-pan pork belly/bacon carbonara is a great way to try out this one-pan technique and only requires 7 common ingredients, most of which are probably already in your pantry—spaghetti, pork belly or bacon, garlic, salt, eggs, parsley, and parmesan cheese.


One-pan Pork Belly Carbonara


This is certainly not the healthiest dish—but believe me, it’s so worth the calories. Pork belly is one of my go-to comfort foods, and I love eating it in ramen, pork adobo, Korean BBQ, and hot pot. Because it’s seen more in Asian cooking, it can sometimes be hard to find at the grocery store. If you can’t find pork belly, feel free to substitute it with thick-cut slices of bacon. In these photos, I added a bit of applewood smoked bacon into the mix since I only had a few slices of pork belly left.


One-pan Pork Belly Carbonara


Because this dish can become rather heavy with the pork belly, cheese, and egg yolks, be sure to add lots of freshly chopped parsley on top to balance everything out.


One-pan Bacon Carbonara


One-pan Pork Belly Carbonara

Ingredients (serves 2-3 people)

  • 8 oz (230g) spaghetti
  • 4 strips of thinly-sliced pork belly or bacon*
  • 3 cloves garlic
  • 2 egg yolks
  • parsley
  • parmesan cheese
  • salt + pepper

* The pork belly slices used for hot pot/shabu shabu would be best!

Takes , Makes 2-3 servings.


Instructions

  1. Chop up the pork belly into half-inch pieces. If you can't find pork belly, feel free to use bacon. In my photos, I used a combination of both.

  2. Sprinkle salt and pepper onto the pork belly. If you're using bacon, you can skip the salt.

  3. Finely chop the parsley and set it aside for garnish later.

  4. Chop the garlic into thin pieces to fry up with the pork belly.

  5. In a large pan (with a bit of depth), fry up the pork belly or bacon until it becomes crispy and renders its fat. If it doesn't release too much oil, feel free to add a little more canola or vegetable oil to the pan. Add in the garlic slices when the pork belly is mostly cooked, making sure to stir them around often since garlic can burn easily. When the pork belly renders its fat and becomes crispy, take the garlic and pork belly out of the pan and drain them on a paper towel, leaving the rendered fat in the pan.

  6. With the heat down, add the spaghetti to the pan and enough water to completely submerge the spaghetti. Turn the heat up and let the water cook the spaghetti, leaving the lid off the pan to let the water evaporate. Move the noodles around to prevent them from sticking together. Be sure to scrape off the bottom of the pan as well to incorporate the pork/bacon fat into the noodles.
  7.  
  8. When the water evaporates and the noodles are finished cooking, add back in the bacon and garlic and incorporate them into the spaghetti. If all the water evaporates and the noodles are not yet cooked, feel free to add more water to the pan.

  9. Season the noodles and pork belly with more salt and pepper to taste. Note that if you're using bacon, you won't need as much salt since the bacon itself provides a lot of the saltiness to this dish.

  10. Turn off the heat and let the pan cool down. Fold in two egg yolks carefully. It's crucial you do this on a slightly-cooled pan so that the eggs don't scramble.

  11. Garnish with the freshly chopped parsley from earlier and grate parmesan cheese on top.

  12. Serve while still hot, and enjoy family style!


Hope you can give this comforting dish a try, and let me know how it turns out for you by tagging @cinders_zhang on Instagram :)

Happy new year everyone!

♥ Cindy

 
Food, 2Cindy ZhangComment
Italy on film
 

This post is going to be a bit of a throwback post. When I visited Italy last summer, I brought along several 35mm disposable film cameras to capture some truly candid shots of Venice, Rome, and Florence. This experience gave me an interesting and different perspective to photography. I’m so used to snapping multiple photos, looking at them, and then taking more to adjust for the mistakes in the previous shots. With a film camera, there’s no way to see what you’ve snapped until much later, until you’ve filled up your camera and gotten all your photos developed, so you really have to think hard about the composition of your photo, as well as find that perfect moment to capture.


Venezia

 
Italy on film - Venice
 

Roma

 
Italy on film - Rome
Italy on film - Venice
Italy on film
Italy on film
Italy on film - Rome
 

Firenze

 
Italy on film - Florence


Now, for the cameras:

Color: Fujifilm QuickSnap Flash 400 Disposable 35mm Camera 

Black & White: Ilford XP2 Super Single Use Camera with Flash (27 Exposures) black and white film

I got my film developed at Oscar’s Photo Lab in San Francisco. You can also get them developed at some Walgreens, CVS, and Costco stores.

Hope you enjoyed the photos, and happy 2019!

♥ Cindy

 
Travel, 2Cindy Zhang Comment